

Ever since I can remember, I’ve been intrigued by the inner workings of mechanical things and gadgets. Back when I was little, most of my toys would inevitably end up disassembled simply because I wanted to see what was inside. Like most kids, I didn’t have much patience, so naturally most of my toys never made it back together unscathed. There were always a few parts left behind. My parents loved it.
Fast forward to today. I’m an adult, and I no longer have the urge to take apart everything that comes into my hands. Thankfully. These days, I like to make things instead, and that’s where my 3D printer comes into play: the ultimate toy for mechanically inclined adults.
I got mine a couple of years back when we still lived in Chicago, and since then the thing has been busy. You can find thousands of models on platforms like Printables or MakerWorld, but I usually make my own designs. I enjoy the process.
Coming back to gadgets and all things mechanical, one of the not-so-obvious things I like about climbing is how much gear you accumulate over time. All these shiny, metal, precise things that move and click in all kinds of ways. Fun.
What’s not so fun is that unless you have a system, all these things will inevitably end up in a big, messy pile somewhere in your apartment. I had one of those back in Chicago. But after we moved to Italy, I decided I was going to do better.
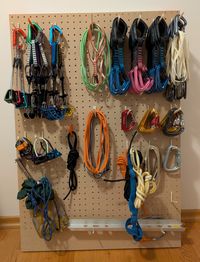
One of my early home improvement projects here was making a pegboard for the climbing gear. It took many trips to the local hardware store and lots of drilling, but the result is pretty good. I learned a thing or two while making it, and I had fun. I actually used my 3D printer for that one too—specifically to print the pegs the gear hangs from.
I sorted out the climbing gear, but then I lost steam and the ropes were left neglected. That is, until today. Today was the first major snow day of the season in Trento. These are always bittersweet. You get all excited about the upcoming season, and you start thinking about snowboarding, but then the snow doesn’t stick and you know it’s going to be gone in a day or two. A sad day for snow enthusiasts, but a perfect day for some DIY action.
The Problem: Rope Closet Chaos
I happened to open the rope closet, and once again I saw the big tangle. I decided to finally deal with it. I spent a few minutes on Printables searching for “the biggest S hook you can print,” but to no avail. I’ll have to design it myself.
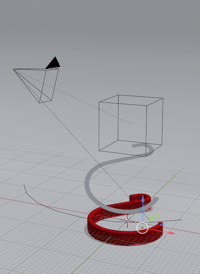
I use 3D software called Blender. I’ll admit it was a steep learning curve and involved hours and hours of “How do I do xyz in Blender” YouTube videos, but I think I can say that I’m now somewhat proficient in it. The cool thing about Blender is how versatile it is. You can make your 3D printing designs. You can also bring them to life through animations. You can even render terrain and hiking maps. The possibilities are truly endless.
After 20 minutes of torturing a few cylinder shapes, I managed to sculpt a reasonably good-looking hook. That’ll do. I exported it and loaded it onto the printer. I first printed a few partial variants just to see if the shape would work before committing to printing the whole thing. The results looked promising, so I decided to print the full version. The printer showed 90 minutes of printing and 1 EUR worth of material. Not bad. I hit Confirm. And now we wait.
The Solution: 3D-Printed Rope Hooks
Design Process in Blender
While I was waiting for my first hook to finish printing, I decided to try something new. I’d been meaning to make some animations in Blender for a while, and this seemed like the perfect opportunity.
Again, after spending some time watching YouTube how-tos, I got the hang of it. It’s kind of like making a real movie. You set up your lights and cameras, and you instruct your designs—your actors—how to look and move. Then you just roll. It took a few attempts, but eventually I got something I was happy with.
Printing the Hooks
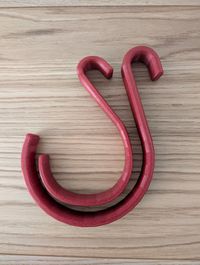
While I was messing with the animations, my print finished and it was time to test it. It was sturdy enough to hold the weight of the rope, and it was big enough—maybe too big, actually. Since I don’t like to waste printing filament, I decided to tweak it a bit. A few minutes later, the printer was loading a smaller, yet equally sturdy (hopefully) version of the hook. An hour and some change later, Hook Jr. was born.
Installing & Final Setup
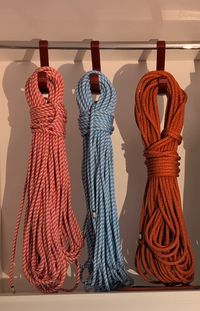
I was happy with the second version, and I decided to print four of them for my remaining ropes. It took a few hours, but I was in no rush. It was still snowing outside. Once they were all ready, I hung the ropes and called it a day. A successful DIY day.
Files & Download Link
If you happen to have a 3D printer and you need an excessively large hook, feel free to download my model file on Printables. And if you’re curious about this project, the pegboard, or 3D printing in general, don’t hesitate to shoot me an email.